つまりCentOS8でRails環境を構築するだけなのだが、ハマったのでメモ。
Contents
構築方法
ここに書かれている内容がわかりやく具体的でスムーズに進められるため、大筋はこの手順どおりとなる。(こちらの記事のおかげで本当に助かりました。素晴らしい記事です。)
Qiita - Ruby on Railsの開発環境をVagrantで構築する
しかし、PostgreSQLのバージョンが古いためにインストールができなかったり、Rails構築前にインストールしないといけないもの(Yarnなど)があるため、その部分を補完していく。
補完箇所
Qiita記事の大項目にあわせて補完箇所を以降に記載。
Vagrantのセットアップ
Qiita記事を参考に書き換えたところ、Vagrantfile(設定ファイル)は以下のようになった。(CentOSのバージョンだけは自分の環境にあわせて変更)
# -*- mode: ruby -*-
# vi: set ft=ruby :

# All Vagrant configuration is done below. The "2" in Vagrant.configure
# configures the configuration version (we support older styles for
# backwards compatibility). Please don't change it unless you know what
# you're doing.
Vagrant.configure("2") do |config|
  # The most common configuration options are documented and commented below.
  # For a complete reference, please see the online documentation at
  # https://docs.vagrantup.com.

  # Every Vagrant development environment requires a box. You can search for
  # boxes at https://vagrantcloud.com/search.
  #config.vm.box = "base"
  config.vm.box = "centos/8"

  # Disable automatic box update checking. If you disable this, then
  # boxes will only be checked for updates when the user runs
  # `vagrant box outdated`. This is not recommended.
  # config.vm.box_check_update = false

  # Create a forwarded port mapping which allows access to a specific port
  # within the machine from a port on the host machine. In the example below,
  # accessing "localhost:8080" will access port 80 on the guest machine.
  # NOTE: This will enable public access to the opened port
  config.vm.network "forwarded_port", guest: 2000, host: 3000

  # Create a forwarded port mapping which allows access to a specific port
  # within the machine from a port on the host machine and only allow access
  # via 127.0.0.1 to disable public access
  # config.vm.network "forwarded_port", guest: 80, host: 8080, host_ip: "127.0.0.1"

  # Create a private network, which allows host-only access to the machine
  # using a specific IP.
  # config.vm.network "private_network", ip: "192.168.33.10"

  # Create a public network, which generally matched to bridged network.
  # Bridged networks make the machine appear as another physical device on
  # your network.
  # config.vm.network "public_network"

  # Share an additional folder to the guest VM. The first argument is
  # the path on the host to the actual folder. The second argument is
  # the path on the guest to mount the folder. And the optional third
  # argument is a set of non-required options.
  # config.vm.synced_folder "../data", "/vagrant_data"

  # Provider-specific configuration so you can fine-tune various
  # backing providers for Vagrant. These expose provider-specific options.
  # Example for VirtualBox:
  #
  config.vm.provider "virtualbox" do |vb|
  #   # Display the VirtualBox GUI when booting the machine
  #   vb.gui = true
  #
  #   # Customize the amount of memory on the VM:
     vb.memory = "2048"
     vb.name = "centos8"
  end
  #
  # View the documentation for the provider you are using for more
  # information on available options.

  # Enable provisioning with a shell script. Additional provisioners such as
  # Puppet, Chef, Ansible, Salt, and Docker are also available. Please see the
  # documentation for more information about their specific syntax and use.
  # config.vm.provision "shell", inline: <<-SHELL
  #   apt-get update
  #   apt-get install -y apache2
  # SHELL
end
Rubyのインストール
Qiita記事は以下のようになっているが
$ rbenv install 2.3.1
$ rbenv global 2.3.1
$ gem install bundler
実行するとmakeできないと言われる。(バージョンはRubyの現時点の最新バージョンにして実行)
$ rbenv install 2.7.0
perl: warning: Setting locale failed.
perl: warning: Please check that your locale settings:
    LANGUAGE = (unset),
    LC_ALL = (unset),
    LANG = "ja_JP.UTF-8"
    are supported and installed on your system.
perl: warning: Falling back to the standard locale ("C").
Downloading ruby-2.7.0.tar.bz2...
-> https://cache.ruby-lang.org/pub/ruby/2.7/ruby-2.7.0.tar.bz2
Installing ruby-2.7.0...

BUILD FAILED (CentOS Linux 8 using ruby-build 20200115-8-g73b926b)

Inspect or clean up the working tree at /tmp/ruby-build.20200208022103.10752.rpki8m
Results logged to /tmp/ruby-build.20200208022103.10752.log

Last 10 log lines:
checking for _setjmp as a macro or function... yes
checking for sigsetjmp as a macro or function... no
checking for setjmp type... __builtin_setjmp
checking for prefix of external symbols... NONE
checking pthread.h usability... yes
checking pthread.h presence... yes
checking for pthread.h... yes
checking if make is GNU make... ./configure: line 29860: make: command not found
no
checking for safe null command for make... configure: error: no candidate for safe null command
代わりに以下を実行する。
makeをインストールする。
$ sudo yum install -y make
最新バージョンを確認する。
$ rbenv install --list
自分の場合は2.7.0が最新バージョンだっため、それを指定して実行する。
$ rbenv install 2.7.0
$ rbenv global 2.7.0
$ gem install bundler
PostgreSQLのインストール
Qiita記事は以下のようになっているが
$ sudo rpm -ivh http://yum.postgresql.org/9.3/redhat/rhel-6-x86_64/pgdg-centos93-9.3-1.noarch.rpm
$ sudo yum -y install postgresql93-server postgresql-devel postgresql93-contrib
以下のようなエラーが表示される。バージョンが古く、メンテナンス切れでリンクがなくなっていることが原因。
$ sudo rpm -ivh http://yum.postgresql.org/9.3/redhat/rhel-6-x86_64/pgdg-centos93-9.3-1.noarch.rpm
Retrieving http://yum.postgresql.org/9.3/redhat/rhel-6-x86_64/pgdg-centos93-9.3-1.noarch.rpm
curl: (22) The requested URL returned error: 403
error: skipping http://yum.postgresql.org/9.3/redhat/rhel-6-x86_64/pgdg-centos93-9.3-1.noarch.rpm - transfer failed
代わりに以下を実行する。
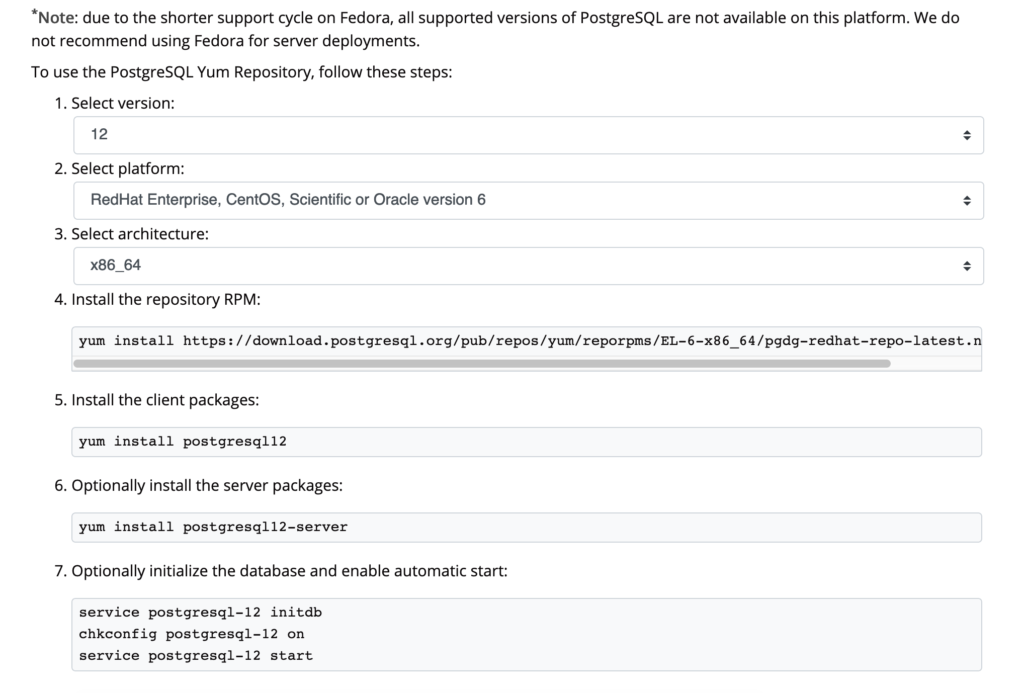
PostgreSQL公式サイトのDownloadから、最新版とPlatformを指定し、そこで表示されるコマンドをsudoで実行する。
PostgreSQL - Linux downloads (Red Hat family) Red Hat
$ sudo yum install https://download.postgresql.org/pub/repos/yum/reporpms/EL-6-x86_64/pgdg-redhat-repo-latest.noarch.rpm
$ sudo yum install -y postgresql12
$ sudo yum install -y postgresql12-server
そして以下を実行する。postgresql12-contrib の部分は、上記で表示されるバージョンにあわせて書き換えること。
$ sudo yum install -y postgresql-devel
$ sudo yum install -y postgresql12-contrib
以降はQiitaの記事のとおりに実行していく。ただし、バージョンの書き換えを忘れないように。
Railsプロジェクトの作成
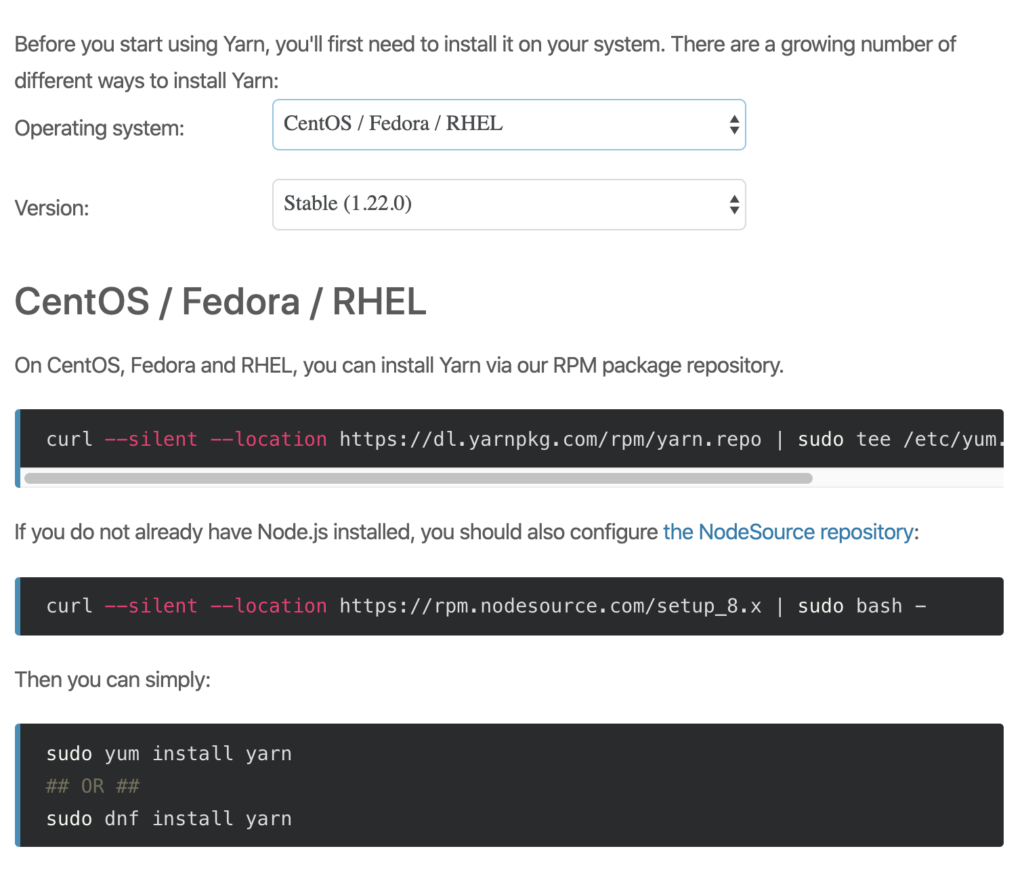
Qiita記事を実行する前に Yarn Installation に沿ってYarnをインストールする。
$ curl --silent --location https://dl.yarnpkg.com/rpm/yarn.repo | sudo tee /etc/yum.repos.d/yarn.repo
$ sudo yum install -y yarn
Qiita記事内では特に利用はされていないが、ついでにSqliteもインストールしておく。
$ sudo yum install sqlite-devel
Qiita記事では以下のようにホームディレクトリにGemファイル郡を保存するように指定されているが、--pathフラグは今後なくなる旨の警告が表示される。
$ bundle install --path ~/bundler/hello_app/vendor/bundle
[DEPRECATED] The `--path` flag is deprecated because it relies on being remembered across bundler invocations, which bundler will no longer do in future versions. Instead please use `bundle config set path 'vendor/bundle'`, and stop using this flag
警告に表示されたコマンドに従って、パスを設定ファイルに書き込む。ちなみに、Railsプロジェクトのルート配下にvendorフォルダを作るやり方が個人的にオススメのため、vendor/bundleとして実行する。
$ bundle config set path 'vendor/bundle'
Your application has set path to "vendor/bundle". This will override the global value you are currently setting
エラーメモ
pg_config... no
もし、PostgreSQLがインストールされていない旨のエラーが表示され、さらに gem install pg してもエラーが表示される場合は、、、
$ bundle exec rails new . --database=postgresql --skip-spring
       exist
      create  README.md
      create  Rakefile
      create  .ruby-version

・・・

Installing pg 1.2.2 with native extensions
Gem::Ext::BuildError: ERROR: Failed to build gem native extension.

    current directory: /home/vagrant/rails-workspace/hello_app/vendor/bundle/ruby/2.7.0/gems/pg-1.2.2/ext
/home/vagrant/.rbenv/versions/2.7.0/bin/ruby -I /home/vagrant/.rbenv/versions/2.7.0/lib/ruby/2.7.0 -r
./siteconf20200208-30318-1ercdmi.rb extconf.rb
checking for pg_config... no
No pg_config... trying anyway. If building fails, please try again with
 --with-pg-config=/path/to/pg_config
checking for libpq-fe.h... no
Can't find the 'libpq-fe.h header
*** extconf.rb failed ***
Could not create Makefile due to some reason, probably lack of necessary
libraries and/or headers.  Check the mkmf.log file for more details.  You may
need configuration options.

・・・

To see why this extension failed to compile, please check the mkmf.log which can be found here:

  /home/vagrant/rails-workspace/hello_app/vendor/bundle/ruby/2.7.0/extensions/x86_64-linux/2.7.0/pg-1.2.2/mkmf.log

extconf failed, exit code 1

Gem files will remain installed in /home/vagrant/rails-workspace/hello_app/vendor/bundle/ruby/2.7.0/gems/pg-1.2.2 for
inspection.
Results logged to
/home/vagrant/rails-workspace/hello_app/vendor/bundle/ruby/2.7.0/extensions/x86_64-linux/2.7.0/pg-1.2.2/gem_make.out

An error occurred while installing pg (1.2.2), and Bundler cannot continue.
Make sure that `gem install pg -v '1.2.2' --source 'https://rubygems.org/'` succeeds before bundling.

In Gemfile:
  pg
         run  bundle binstubs bundler
Could not find gem 'pg (>= 0.18, < 2.0)' in any of the gem sources listed in your Gemfile.
       rails  webpacker:install
Could not find gem 'pg (>= 0.18, < 2.0)' in any of the gem sources listed in your Gemfile.
Run `bundle install` to install missing gems.

・・・

$ gem install pg -v '1.2.2' --source 'https://rubygems.org/'
Fetching pg-1.2.2.gem
Building native extensions. This could take a while...
ERROR:  Error installing pg:
    ERROR: Failed to build gem native extension.
postgresql-develをインストールすると解決する。
$ sudo yum install postgresql-devel
Yarn not installed
Yarnがないと言われる場合は、、、
$ bundle exec rails new . --database=postgresql --skip-spring
       exist
      create  README.md
      create  Rakefile

・・・

Bundle complete! 15 Gemfile dependencies, 73 gems now installed.
Bundled gems are installed into `./vendor/bundle`
         run  bundle binstubs bundler
The dependency tzinfo-data (>= 0) will be unused by any of the platforms Bundler is installing for. Bundler is installing for ruby but the dependency is only for x86-mingw32, x86-mswin32, x64-mingw32, java. To add those platforms to the bundle, run `bundle lock --add-platform x86-mingw32 x86-mswin32 x64-mingw32 java`.
       rails  webpacker:install
Yarn not installed. Please download and install Yarn from https://yarnpkg.com/lang/en/docs/install/
Yarn Installation でCentOSを選択してYarnをインストールすると解決する。
$ curl --silent --location https://dl.yarnpkg.com/rpm/yarn.repo | sudo tee /etc/yum.repos.d/yarn.repo
$ sudo yum install -y yarn
sqlite3.h... no
Sqliteがないと言われる場合は、、、
$ mkdir hello_app
$ cd hello_app
$ bundle init
$ vi Gemfile ← 編集でコメントアウトされているrailsを外すだけ
$ bundle install
$ bundle exec rails new .
       exist
      create  README.md
      create  Rakefile

・・・

Fetching sqlite3 1.4.2
Installing sqlite3 1.4.2 with native extensions
Gem::Ext::BuildError: ERROR: Failed to build gem native extension.

    current directory: /home/vagrant/rails-workspace/hello_app/vendor/bundle/ruby/2.7.0/gems/sqlite3-1.4.2/ext/sqlite3
/home/vagrant/.rbenv/versions/2.7.0/bin/ruby -I /home/vagrant/.rbenv/versions/2.7.0/lib/ruby/2.7.0 -r
./siteconf20200208-12025-13ic82v.rb extconf.rb
checking for sqlite3.h... no
sqlite3.h is missing. Try 'brew install sqlite3',
'yum install sqlite-devel' or 'apt-get install libsqlite3-dev'
and check your shared library search path (the
location where your sqlite3 shared library is located).
*** extconf.rb failed ***
Could not create Makefile due to some reason, probably lack of necessary
libraries and/or headers.  Check the mkmf.log file for more details.  You may
need configuration options.

・・・

To see why this extension failed to compile, please check the mkmf.log which can be found here:

  /home/vagrant/rails-workspace/hello_app/vendor/bundle/ruby/2.7.0/extensions/x86_64-linux/2.7.0/sqlite3-1.4.2/mkmf.log

extconf failed, exit code 1

Gem files will remain installed in /home/vagrant/rails-workspace/hello_app/vendor/bundle/ruby/2.7.0/gems/sqlite3-1.4.2 for
inspection.
Results logged to
/home/vagrant/rails-workspace/hello_app/vendor/bundle/ruby/2.7.0/extensions/x86_64-linux/2.7.0/sqlite3-1.4.2/gem_make.out

An error occurred while installing sqlite3 (1.4.2), and Bundler cannot continue.
Make sure that `gem install sqlite3 -v '1.4.2' --source 'https://rubygems.org/'` succeeds before bundling.

In Gemfile:
  sqlite3
         run  bundle binstubs bundler
Could not find gem 'sqlite3 (~> 1.4)' in any of the gem sources listed in your Gemfile.
         run  bundle exec spring binstub --all
Could not find gem 'sqlite3 (~> 1.4)' in any of the gem sources listed in your Gemfile.
Run `bundle install` to install missing gems.
       rails  webpacker:install
Could not find gem 'sqlite3 (~> 1.4)' in any of the gem sources listed in your Gemfile.
Run `bundle install` to install missing gems.
[vagrant@localhost hello_app]$ gem install sqlite3 -v '1.4.2
> ç e
> exit
> ç^C
Sqliteをインストールすると解決する。
$ sudo yum install sqlite-devel

